Spring Boot + WebSocket Basic Example
WebSocket vs HTTP
WebSocket is a computer communications protocol, for two or more computers to communicate with each other at the same time (full-duplex) over a single TCP connection. Here some differences between HTTP (the most common protocol used for internet applications) and WebSocket:
| HTTP | Web Socket | |
|---|---|---|
| Messaging Pattern | Unidirectional, client always initiates the request and server response | Bi-directional, either client or server can initiate sending a message |
| Duplex | Half, response occur after request | Full, client/server communication are independent |
| Service Push | Not natively supported. Client polling or streaming download techniques used | Core feature |
| Connections | Multiple TCP connections. For each request/response a new TCP session is needed | Single TCP connection. After initial connection using HTTP, the connection then upgraded to a socket based connection and used for all the future communication |
| Overhead | Moderate overhead per request/connection | Moderate overhead to establish & maintain the connection, then minimal overhead per message |
| Caching | Supported. HTTP supports caching so that content can be stored locally by the browser and reused when required. | Not possible. Don't fit in the necessary scheme for caching, e.g. one requests which results in the same response every time |
| Supported clients | Broad support | Modern languages & clients |
This article about Spring Boot and WebSocket means to be part of a series. In this post, we will learn to create a basic WebSocket application. The example in this article is a simple web application that broadcast messages using plain WebSocket connection.
Let's start by creating a new Spring Boot application.
Creating Spring Boot Application
Generate Spring Boot application we can use Spring Initializr (https://start.spring.io/ ) or Spring Boot CLI. For this tutorial, add WebSocket dependency:
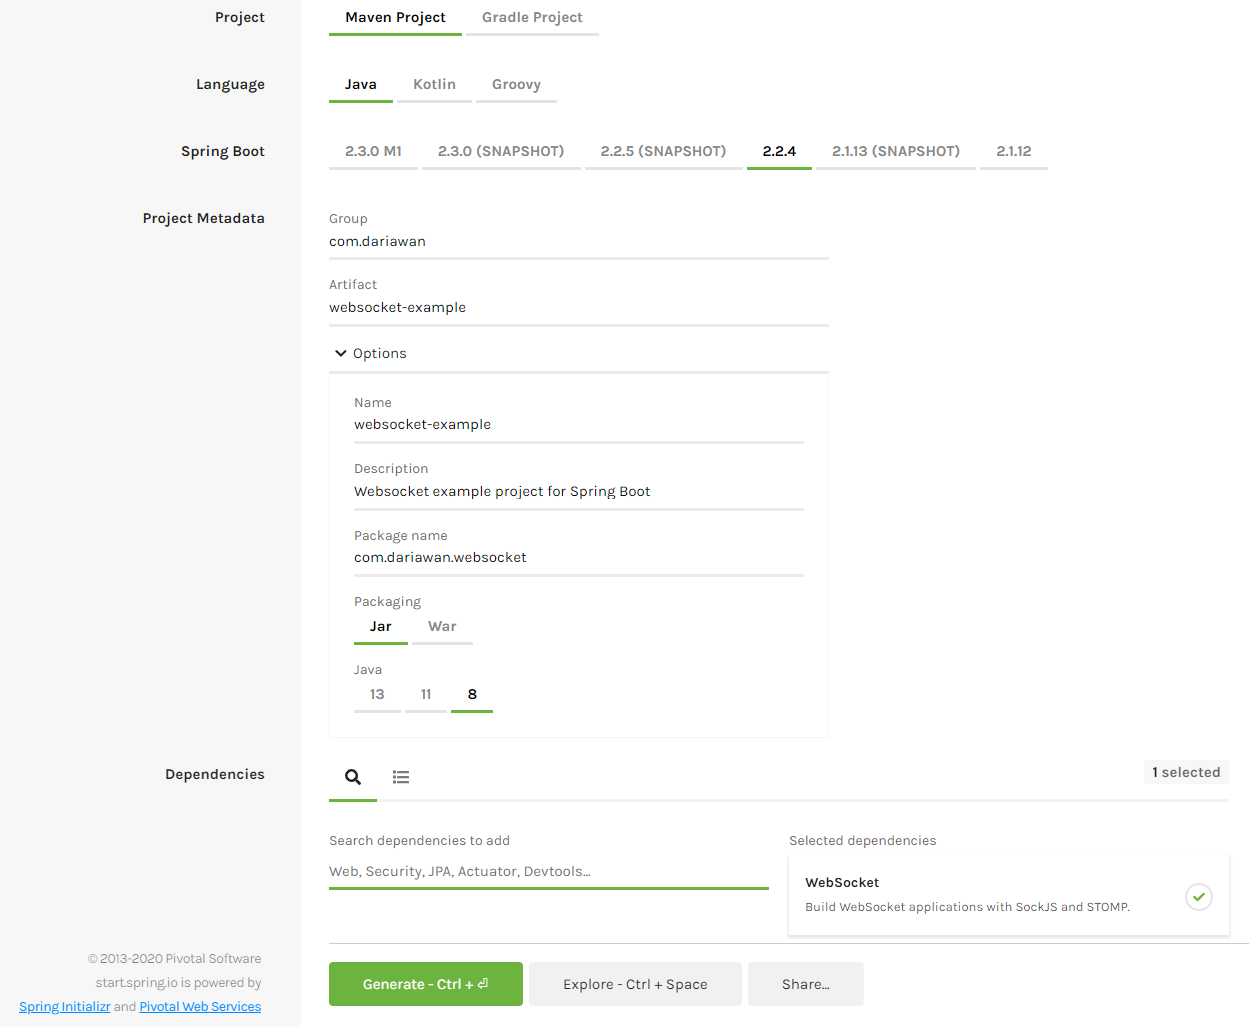
Create Project in https://start.spring.io/
More dependencies needed to complete the application:
- Thymeleaf
- Webjars (Bootstrap and jQuery)
- Lombok
Since we are using maven, here pom.xml for this project:
pom.xml
<?xml version="1.0" encoding="UTF-8"?>
<project xmlns="http://maven.apache.org/POM/4.0.0" xmlns:xsi="http://www.w3.org/2001/XMLSchema-instance"
         xsi:schemaLocation="http://maven.apache.org/POM/4.0.0 https://maven.apache.org/xsd/maven-4.0.0.xsd">
    <modelVersion>4.0.0</modelVersion>
    <parent>
        <groupId>org.springframework.boot</groupId>
        <artifactId>spring-boot-starter-parent</artifactId>
        <version>2.2.4.RELEASE</version>
        <relativePath/> <!-- lookup parent from repository -->
    </parent>
    <groupId>com.dariawan</groupId>
    <artifactId>websocket-example</artifactId>
    <version>0.0.1-SNAPSHOT</version>
    <name>websocket-example</name>
    <description>Websocket example project for Spring Boot</description>

    <properties>
        <java.version>1.8</java.version>
    </properties>

    <dependencies>
        <dependency>
            <groupId>org.springframework.boot</groupId>
            <artifactId>spring-boot-starter-websocket</artifactId>
        </dependency>
        <dependency>
            <groupId>org.springframework.boot</groupId>
            <artifactId>spring-boot-starter-thymeleaf</artifactId>
        </dependency>

        <dependency>
            <groupId>org.projectlombok</groupId>
            <artifactId>lombok</artifactId>
            <optional>true</optional>
        </dependency>
        <!-- https://mvnrepository.com/artifact/org.webjars/bootstrap -->
        <dependency>
            <groupId>org.webjars</groupId>
            <artifactId>bootstrap</artifactId>
            <version>4.4.1</version>
        </dependency>
        <!-- https://mvnrepository.com/artifact/org.webjars/jquery -->
        <dependency>
            <groupId>org.webjars</groupId>
            <artifactId>jquery</artifactId>
            <version>3.4.1</version>
        </dependency>


        <dependency>
            <groupId>org.springframework.boot</groupId>
            <artifactId>spring-boot-starter-test</artifactId>
            <scope>test</scope>
            <exclusions>
                <exclusion>
                    <groupId>org.junit.vintage</groupId>
                    <artifactId>junit-vintage-engine</artifactId>
                </exclusion>
            </exclusions>
        </dependency>
    </dependencies>

    <build>
        <plugins>
            <plugin>
                <groupId>org.springframework.boot</groupId>
                <artifactId>spring-boot-maven-plugin</artifactId>
            </plugin>
        </plugins>
    </build>
</project>
Spring Boot Application
WebSocketExampleApplication is the main entry point of our Spring Boot application:
WebSocketExampleApplication.java
package com.dariawan.websocket;

import org.springframework.boot.SpringApplication;
import org.springframework.boot.autoconfigure.SpringBootApplication;

@SpringBootApplication
public class WebSocketExampleApplication {

    public static void main(String[] args) {
        SpringApplication.run(WebSocketExampleApplication.class, args);
    }
}
Creating WebSocket Handler
In Spring we can create a customized handler by extends abstract class AbstractWebSocketHandler or one of it's subclass, either TextWebSocketHandler or BinaryWebSocketHandler:
- TextWebSocketHandler
Base class forWebSocketHandlerimplementations that process text messages only. - BinaryWebSocketHandler
Base class forWebSocketHandlerimplementations that process binary messages only.
For our sample, since we need to handle only text so our class MyTextWebSocketHandler will extends TextWebSocketHandler.
MyTextWebSocketHandler.java
package com.dariawan.websocket.handler;

import java.io.IOException;
import java.util.List;
import java.util.concurrent.CopyOnWriteArrayList;
import org.slf4j.Logger;
import org.slf4j.LoggerFactory;
import org.springframework.web.socket.CloseStatus;
import org.springframework.web.socket.TextMessage;
import org.springframework.web.socket.WebSocketSession;
import org.springframework.web.socket.handler.TextWebSocketHandler;

public class MyTextWebSocketHandler extends TextWebSocketHandler {

    private static final Logger LOGGER = LoggerFactory.getLogger(MyTextWebSocketHandler.class);

    private final List<WebSocketSession> sessions = new CopyOnWriteArrayList<>();

    @Override
    public void afterConnectionEstablished(WebSocketSession session) throws Exception {
        sessions.add(session);
        super.afterConnectionEstablished(session);
    }

    @Override
    public void afterConnectionClosed(WebSocketSession session, CloseStatus status) throws Exception {
        sessions.remove(session);
        super.afterConnectionClosed(session, status);
    }

    @Override
    protected void handleTextMessage(WebSocketSession session, TextMessage message) throws Exception {
        super.handleTextMessage(session, message);
        sessions.forEach(webSocketSession -> {
            try {
                webSocketSession.sendMessage(message);
            } catch (IOException e) {
                LOGGER.error("Error occurred.", e);
            }
        });
    }
}
Spring Web Socket Configuration
For Spring application to forward client requests to the endpoint , we need to register the handler. Class WebSocketConfig is a customized configuration class that implements interface WebSocketConfigurer. WebSocketConfigurer interface defines callback methods to configure the WebSocket request handling (example: adding WebSocket handler) via @EnableWebSocket annotation.
WebSocketConfig.java
package com.dariawan.websocket.config;

import com.dariawan.websocket.handler.MyTextWebSocketHandler;
import org.springframework.context.annotation.Configuration;
import org.springframework.web.socket.config.annotation.EnableWebSocket;
import org.springframework.web.socket.config.annotation.WebSocketConfigurer;
import org.springframework.web.socket.config.annotation.WebSocketHandlerRegistry;

@Configuration
@EnableWebSocket
public class WebSocketConfig implements WebSocketConfigurer {

    @Override
    public void registerWebSocketHandlers(WebSocketHandlerRegistry webSocketHandlerRegistry) {
        webSocketHandlerRegistry.addHandler(new MyTextWebSocketHandler(), "/web-socket");
    }
}
Controller and HTML Template
Next, we create the UI part for establishing WebSocket and making the calls. Define the WebSocketController as follow:
WebSocketController.java
package com.dariawan.websocket.controller;

import org.springframework.stereotype.Controller;
import org.springframework.web.bind.annotation.RequestMapping;

@Controller
public class WebSocketController {

    @RequestMapping("/websocket")
    public String getWebSocket() {
        return "ws-broadcast";
    }
}
Function getWebSocket() returning the name of Thymeleaf template that will be used to render the response. The template that will be rendered in this function is ws-broadcast.html. Please refer to Adding Controller in Spring Boot + Thymeleaf CRUD Example.
ws-broadcast.html
<!DOCTYPE HTML>
<html xmlns:th="http://www.thymeleaf.org">
<head>
<title>Plain WebSocket Example</title>
<th:block th:include="fragments/common.html :: headerfiles"></th:block>
</head>
<body>
<div class="container">
<div class="py-5 text-center">
<h2>Basic Web socket</h2>
<p class="lead">Sample of basic WebSocket broadcast - without STOMP & SockJS.</p>
</div>
<div class="row">
<div class="col-md-6">
<div class="row mb-3">
<div class="input-group">
Web socket connection:
<div class="btn-group">
<button type="button" id="connect" class="btn btn-sm btn-outline-secondary" onclick="connect()">Connect</button>
<button type="button" id="disconnect" class="btn btn-sm btn-outline-secondary" onclick="disconnect()" disabled>Disconnect</button>
</div>
</div>
</div>
<div class="row mb-3">
<div class="input-group" id="sendmessage" style="display: none;">
<input type="text" id="message" class="form-control" placeholder="Message">
<div class="input-group-append">
<button id="send" class="btn btn-primary" onclick="send()">Send</button>
</div>
</div>
</div>
</div>
<div class="col-md-6">
<div id="content"></div>
</div>
</div>
</div>
<footer th:insert="fragments/common.html :: footer"></footer>
<script>
var ws;
function setConnected(connected) {
$("#connect").prop("disabled", connected);
$("#disconnect").prop("disabled", !connected);
if (connected) {
$("#sendmessage").show();
} else {
$("#sendmessage").hide();
}
}
function connect() {
/*<![CDATA[*/
var url = /*[['ws://'+${#httpServletRequest.serverName}+':'+${#httpServletRequest.serverPort}+@{/web-socket}]]*/ 'ws://localhost:8080/web-socket';
/*]]>*/
ws = new WebSocket(url);
ws.onopen = function () {
showBroadcastMessage('<div class="alert alert-success">Connected to server</div>');
};
ws.onmessage = function (data) {
showBroadcastMessage(createTextNode(data.data));
};
setConnected(true);
}
function disconnect() {
if (ws != null) {
ws.close();
showBroadcastMessage('<div class="alert alert-warning">Disconnected from server</div>');
}
setConnected(false);
}
function send() {
ws.send($("#message").val());
$("#message").val("");
}
function createTextNode(msg) {
return '<div class="alert alert-info">' + msg + '</div>';
}
function showBroadcastMessage(message) {
$("#content").html($("#content").html() + message);
}
</script>
</body>
</html>
We are using th:include and th:insert from Thymeleaf's page layout, and Webjars. We will not talk about these things in this article. For completeness of the example, here the content of common.html:
common.html
<!DOCTYPE HTML>
<html xmlns:th="http://www.thymeleaf.org">
    <head th:fragment="headerfiles">
        <meta charset="UTF-8">
        <meta name="viewport" content="width=device-width, initial-scale=1.0">
        <link rel="stylesheet" type="text/css" th:href="@{/webjars/bootstrap/4.4.1/css/bootstrap.css}"/>
        <link rel="stylesheet" type="text/css" th:href="@{/css/main.css}"/>
        <script th:src="@{/webjars/jquery/3.4.1/jquery.js}" ></script>
    </head>
    <body>
        <footer th:fragment="footer" class="my-5 text-muted text-center text-small">
            <p class="mb-1">© 2020 Dariawan</p>
            <ul class="list-inline">
                <li class="list-inline-item"><a href="https://www.dariawan.com">Homepage</a></li>
                <li class="list-inline-item"><a href="#">Articles</a></li>
            </ul>
        </footer>
    </body>
</html>
Run Application
We can run our application from IDE, or from terminal. From terminal, go to the project’s root directory and run:
$ mvn spring-boot:run
It'll run the main method in WebSocketExampleApplication class. Open browser and make request at http://localhost:8080/websocket.
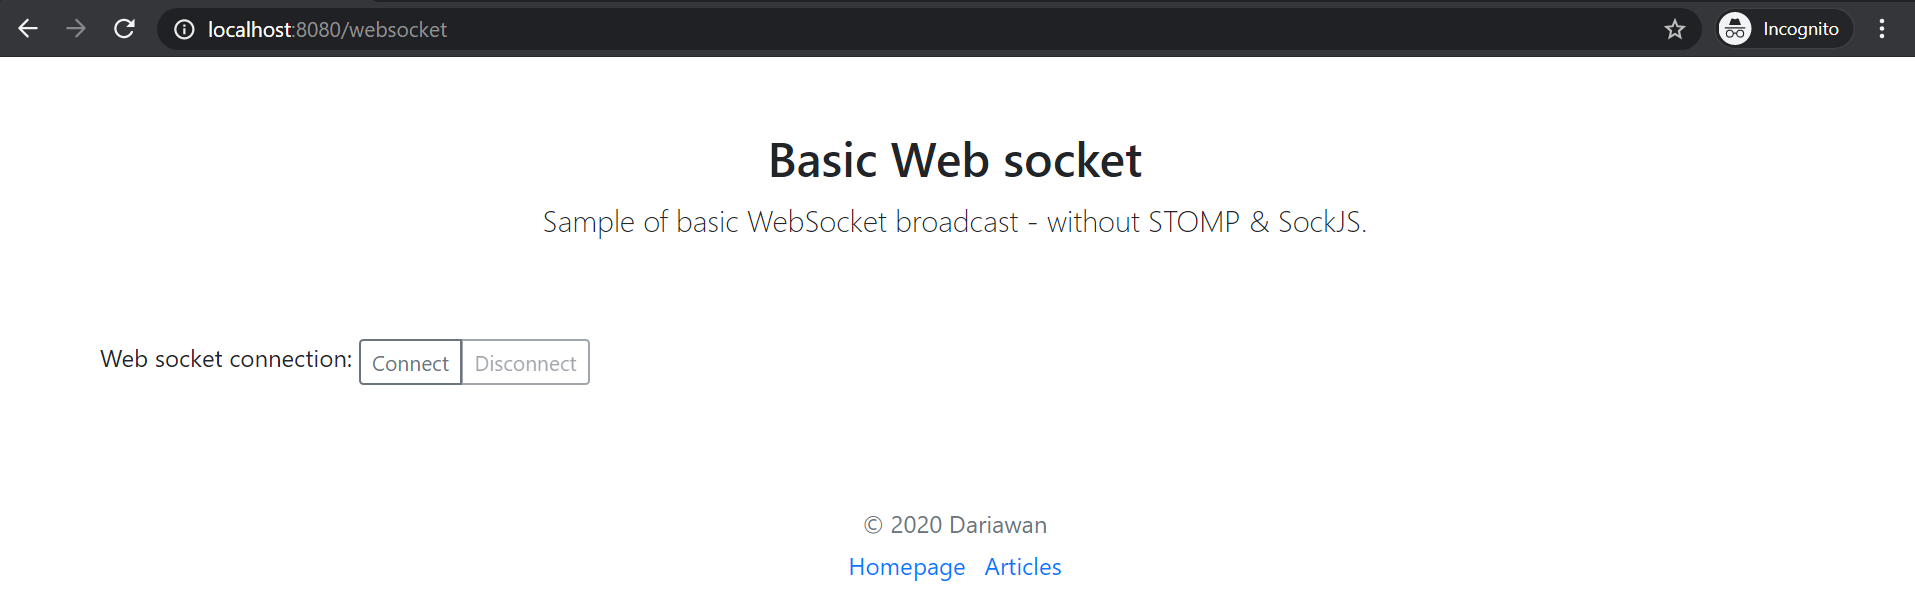
http://localhost:8080/websocket
Create WebSocket connection by clicking "Connect" button. Here the request headers when make connection (truncated - with unnecessary information removed).
Host: localhost:8080
Origin: http://localhost:8080
Sec-WebSocket-Version: 13
Sec-WebSocket-Extensions: permessage-deflate
Sec-WebSocket-Key: PSfHzxFfZC1KVUUuC1fQHg==
Connection: keep-alive, Upgrade
Upgrade: websocket
And here response headers (also truncated)
HTTP/1.1 101
Upgrade: websocket
Connection: upgrade, keep-alive
Sec-WebSocket-Accept: to0bX/YSZHbE/Rtp2OOo5qXpR7I=
Sec-WebSocket-Extensions: permessage-deflate
After that, we can start broadcast the message. You can open multiple session of http://localhost:8080/websocket
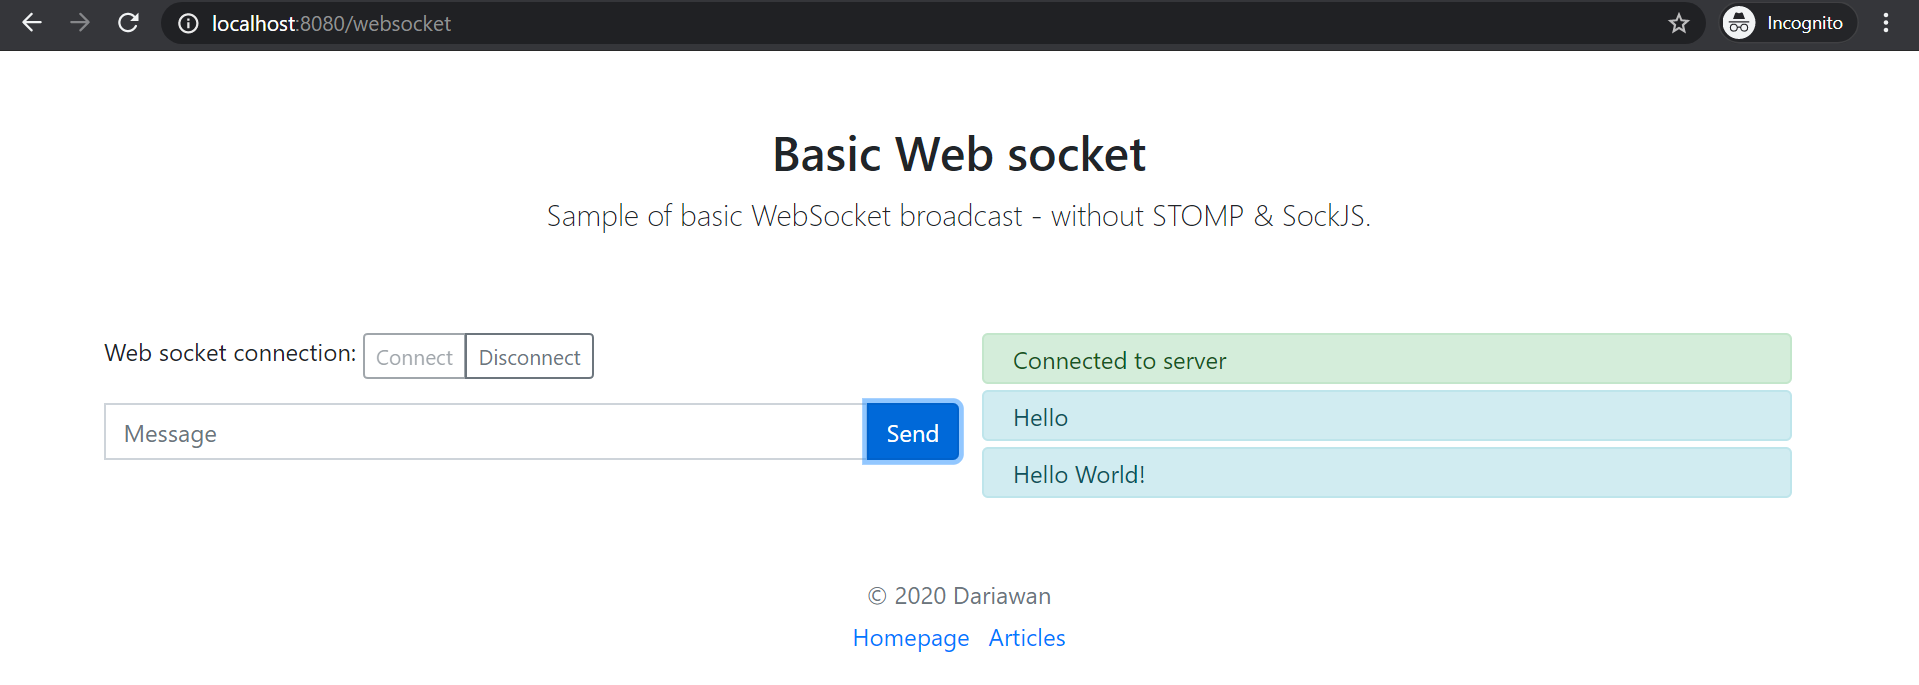
connect and broadcast message
On clicking "Disconnect" the WebSocket connection will be closed.

Desson AriawanProgrammer